A few months back, I had one of my old desktops give up the ghost and I have been working on salvaging what parts I can from it since then. I have gotten a lot of useable parts from the motherboard, transferred the hard disks to a working desktop, and I pulled the power supply out.
Afterwords, I caught a glimpse at the voltages it is capable of (-12, -5, 3.3 5, 12) and It amazed me. These are voltages I use in my projects all the time!!!!!!!! So I reasoned that I can tap into these and have myself a nifty bench power supply.
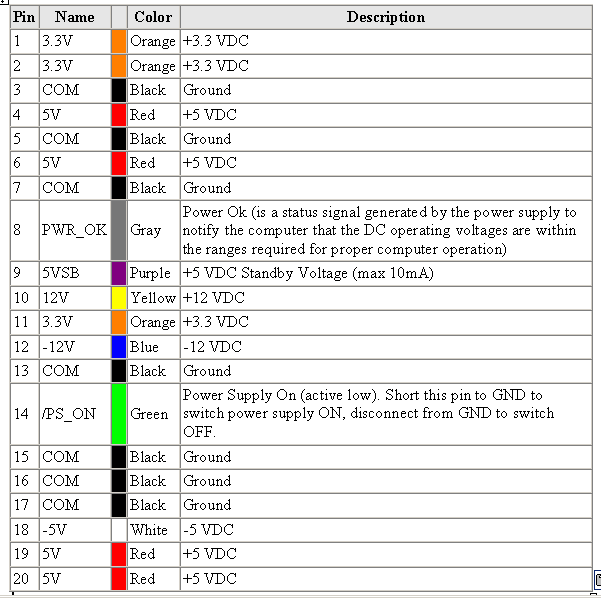
So I looked up the pinout of my PSU and found this:
Using this as a guide, I threw together a little experiment to see what I could do. I found my old car stereo and some speakers in a box, hooked them up, and got this:
I have been meaning to put this in my current car for almost a year now, but I keep forgetting to buy the wiring adapters when I have money... It does interface perfectly with my new iPhone and works much better than the tape adapter I'm using right now :)
Anyway, while this works fairly well as it is, I can't leave it looking that raggedy. My workstation gets rather messy, but I can't have a new permanent addition that looks this bad. So I set to work designing a case/housing for it. I had some scrap wood left over from my laptop->all in one project (which I'm typing this on now lol) I sketched out a design, laid it out on the wood, and took it to get cut at Caytee's Dad's house. (He has a lovely table saw)
Without further ado, my box coming together:
The pieces cut and PSU waiting to be assembled
The sides nailed in place
From the back:
With the lid sitting on top
From the front with the top on
I've still got a ways to go with this, so I haven't permanently attached the top piece yet. I am going to hook up some sort of LED lighting inside. I'm thinking a few RGB LED's and an atmega to cycle sone colors around inside. I am also going to attach a piece of clear plexiglas on the front with banana-jacks in a grid and toggle switch to control it. I have a lead on someone with plexiglas I can get for free, but funds are tight this month, so it may be a while before I come back to this.
So for now, it will work nicely where it is:
UPDATE!
So I got some plexiglass at a salvage store for around 2 bucks, so I figured it's time to get back to work on this guy. It was going pretty well until I got to the last hole and it exploded... It took out about a quarter off of the top right side, but otherwise it was unscathed. So it looks a little something like this:
I'll get around to re-making this at some point, but it was a pretty humbling disaster...
So I did a little test engraving to see if I could at least make the best of this for now:
I've got 2 12 volt posts and a big fat power switch
A 5 volt and 3.3 volt post
A -5 and -12 volt post
And 2 ground posts mounted sideways.
I've got 2 cables for this setup with banana plugs on one end and alligator clips on the other end. It's not the prettiest looking thing, ...yet.
That's it for now, I hope you guys like it!


No comments:
Post a Comment